In just two months (in April 2025), the widely used Linux distribution Ubuntu 20.04, code named Focal Fossa, will be end of life (EOL) and won't receive any public updates anymore. Time to upgrade!
Goodbye, Ubuntu Focal Fossa
Canonical, the company behind Ubuntu, continues to support Ubuntu 20.04 LTS for another 5 years for paying customers through the Extended Security Maintenance plan. See our list of LTS Linux distributions for more details.

Although an upgrade of Ubuntu to a newer LTS version, usually works very well, there are always some gotchas or configuration changes.
We've put together a list of applications to watch out for when upgrading your Ubuntu LTS version from 20.04 to 22.04 or the currently newest LTS release (24.04).
Note: Never jump across a major LTS release! Upgrade from one LTS version to the next. 20.04 -> 22.04 -> 24.04 etc.
sudoers
The /etc/sudoers file received some changes. However if you added entries to /etc/sudoers, these will be overwritten and be gone if you decide to not keep your existing configuration:
Configuration file '/etc/sudoers'
 ==> Modified (by you or by a script) since installation.
 ==> Package distributor has shipped an updated version.
   What would you like to do about it ?  Your options are:
    Y or I  : install the package maintainer's version
    N or O  : keep your currently-installed version
      D     : show the differences between the versions
      Z     : start a shell to examine the situation
 The default action is to keep your current version.
*** sudoers (Y/I/N/O/D/Z) [default=N] ? N
We recommend to keep the /etc/sudoers file as is and manually add the changes. Which are:
- Added "Defaults use_pty"
- Changed syntax from #include to @include
You can easily append these changes after the distribution upgrade with the following sed commands:
root@jammy:~# sed -i "/secure_path/ a\Defaults        use_pty" /etc/sudoers
root@jammy:~# sed -i "s/#include/@include/g" /etc/sudoers
Maybe now is also a good time to move all your custom added sudoers rules and entries into a separate file into the /etc/sudoers.d/ directory to prevent running into this problem again at the next distribution upgrade.
New APT repository key method
With the change from Ubuntu 20.04 to 22.04, the way apt repository keys is slightly different.
In the past releases, an APT repository key were added to the system by using the apt-key command. Here's an example using the PowerDNS APT repositories:
root@focal:~# curl -s https://repo.powerdns.com/CBC8B383-pub.asc | apt-key add -
OK
You then needed to add the repository in a .list file (without mentioning the key):
root@focal:~# cat /etc/apt/sources.list.d/powerdns.list
deb http://repo.powerdns.com/ubuntu focal-auth-49 main
After a dist-upgrade to 22.04 (or newer), this apt-key method now leads to to a deprecation warning:
root@jammy:~# apt-get update
Hit:1 http://repo.powerdns.com/ubuntu jammy-auth-49 InRelease
[...]
Fetched 3755 kB in 1s (2569 kB/s)
Reading package lists... Done
W: http://repo.powerdns.com/ubuntu/dists/jammy-auth-49/InRelease: Key is stored in legacy trusted.gpg keyring (/etc/apt/trusted.gpg), see the DEPRECATION section in apt-key(8) for details.
From now on, you need to download and save APT repository keys as separate "keyring" files and the repository needs to refer to this saved key:
root@jammy:~# curl -fsSL http://repo.powerdns.com/FD380FBB-pub.asc | sudo gpg --dearmor -o /usr/share/keyrings/powerdns.gpg

root@jammy:~# echo "deb [signed-by=/usr/share/keyrings/powerdns.gpg] http://repo.powerdns.com/ubuntu jammy-auth-49 main" | sudo tee /etc/apt/sources.list.d/powerdns.list
deb [signed-by=/usr/share/keyrings/powerdns.gpg] http://repo.powerdns.com/ubuntu jammy-auth-49 main
After this change, the output of apt update doesn't show the deprecation warning anymore:
root@jammy:~# apt-get update
Hit:1 http://repo.powerdns.com/ubuntu jammy-auth-49 InRelease
Hit:2 http://eu-central-1.ec2.archive.ubuntu.com/ubuntu jammy InRelease
Hit:3 http://eu-central-1.ec2.archive.ubuntu.com/ubuntu jammy-updates InRelease
Hit:4 http://security.ubuntu.com/ubuntu jammy-security InRelease
Reading package lists... Done
libc6 service restart error
During the distribution upgrade process, you might run into a service restart error, triggered by the libc package upgrade:
Unpacking libc6:amd64 (2.35-0ubuntu3.9) over (2.31-0ubuntu9.17) ...
Setting up libc6:amd64 (2.35-0ubuntu3.9) ...
Checking for services that may need to be restarted...
Checking init scripts...
Restarting services possibly affected by the upgrade:
  cron: restarting...done.
  mysql: restarting...FAILED! (1)
  atd: restarting...done.
In this situation the mysql service failed to restart. Although this doesn't look nice in the output, this can be ignored and the upgrade process continues on.
MySQL or MariaDB will restart anyway once these packages are upgraded, too.
PostgreSQL Upgrade
In Ubuntu 20.04 the default PostgreSQL version is 12. A distribution upgrade to Ubuntu 22.04 upgrades PostgreSQL to version 14. Upgrades? The PostgreSQL upgrade is better described as new and secondary installation to the previous version.
After the Ubuntu upgrade two PostgreSQL clusters show up:
root@jammy:~# pg_lsclusters
Ver Cluster Port Status Owner    Data directory              Log file
12  main    5432 online postgres /var/lib/postgresql/12/main /var/log/postgresql/postgresql-12-main.log
14  main    5433 online postgres /var/lib/postgresql/14/main /var/log/postgresql/postgresql-14-main.log
We can see that the older version (12) is still running under the default PostgreSQL port tcp/5432. The newly installed PostgreSQL 14 cluster is listening under tcp/5433. Both versions run alongside after the Ubuntu upgrade.
Does the newer version actually contain the application databases?
First connect to the original PostgreSQL server, running version 12:
root@jammy:~# su - postgres

postgres@jammy:~$ psql -p 5432
psql (14.15 (Ubuntu 14.15-0ubuntu0.22.04.1), server 12.22 (Ubuntu 12.22-0ubuntu0.20.04.1))
Type "help" for help.

postgres=# \l
                              List of databases
   Name    |  Owner   | Encoding | Collate |  Ctype  |   Access privileges
-----------+----------+----------+---------+---------+-----------------------
 dnsui     | dnsui    | UTF8     | C.UTF-8 | C.UTF-8 |
 postgres  | postgres | UTF8     | C.UTF-8 | C.UTF-8 |
 template0 | postgres | UTF8     | C.UTF-8 | C.UTF-8 | =c/postgres          +
           |          |          |         |         | postgres=CTc/postgres
 template1 | postgres | UTF8     | C.UTF-8 | C.UTF-8 | =c/postgres          +
           |          |          |         |         | postgres=CTc/postgres
(4 rows)
The application database ('dnsui' in this example) shows up. As expected.
What about the newly installed PostgreSQL 14? Let's verify:
postgres@jammy:~$ psql -p 5433
psql (14.15 (Ubuntu 14.15-0ubuntu0.22.04.1))
Type "help" for help.

postgres=# \l
                              List of databases
   Name    |  Owner   | Encoding | Collate |  Ctype  |   Access privileges
-----------+----------+----------+---------+---------+-----------------------
 postgres  | postgres | UTF8     | C.UTF-8 | C.UTF-8 |
 template0 | postgres | UTF8     | C.UTF-8 | C.UTF-8 | =c/postgres          +
           |          |          |         |         | postgres=CTc/postgres
 template1 | postgres | UTF8     | C.UTF-8 | C.UTF-8 | =c/postgres          +
           |          |          |         |         | postgres=CTc/postgres
(3 rows)
The application database is missing here!
This means the Ubuntu distribution upgrade installed a new but empty PostgreSQL 14, but did not upgrade the existing databases to the new PostgreSQL version.
To do a proper database upgrade, you first need to shut down the new (and empty) PostgreSQL 14 server and delete the cluster:
root@jammy:~# pg_dropcluster --stop 14 main

root@jammy:~# pg_lsclusters
Ver Cluster Port Status Owner    Data directory              Log file
12  main    5432 online postgres /var/lib/postgresql/12/main /var/log/postgresql/postgresql-12-main.log
Now run the pg_upgradecluster command to upgrade the PostgreSQL 12 instance to version 14:
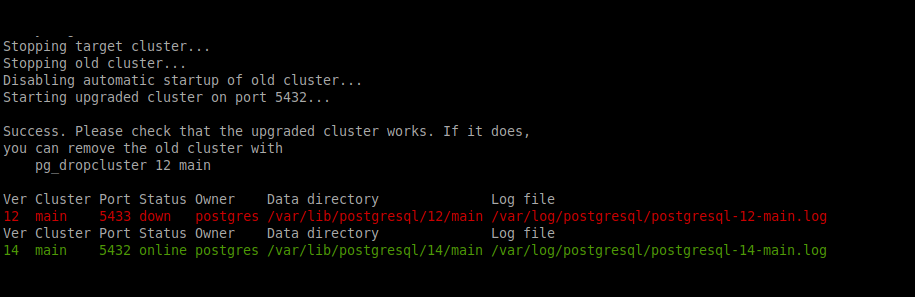
root@jammy:~# pg_upgradecluster 12 main
Stopping old cluster...
Restarting old cluster with restricted connections...
[...]
Stopping target cluster...
Stopping old cluster...
Disabling automatic startup of old cluster...
Starting upgraded cluster on port 5432...

Success. Please check that the upgraded cluster works. If it does,
you can remove the old cluster with
    pg_dropcluster 12 main

Ver Cluster Port Status Owner    Data directory              Log file
12  main    5433 down   postgres /var/lib/postgresql/12/main /var/log/postgresql/postgresql-12-main.log
Ver Cluster Port Status Owner    Data directory              Log file
14  main    5432 online postgres /var/lib/postgresql/14/main /var/log/postgresql/postgresql-14-main.log
Now the databases were upgraded/migrated to the newer PostgreSQL version. The tcp listener has also changed now and the default PostgreSQL port tcp/5432 now points to PostgreSQL 14.
This is the time where you test your applications, using PostgreSQL databases. If all is successful, you can remove the now powered down old PostgreSQL version using pg_dropcluster.
Apache2 + PHP module
In Ubuntu 20.04 the onboard PHP version was 7.4. After the Ubuntu upgrade to 22.04, the new PHP version is 8.1 and php7.4 packages are removed by the upgrade process.
If you use an Apache2 web server and enabled the PHP module (libapache2-mod-php), Apache2 will run into a problem and will not start anymore. This can be seen in the apache2 service status:

The status output above doesn't show the reason though. To find out more, we can run apache2ctl:
root@jammy:~# apache2ctl configtest
apache2: Syntax error on line 146 of /etc/apache2/apache2.conf: Syntax error on line 3 of /etc/apache2/mods-enabled/php7.4.load: Cannot load /usr/lib/apache2/modules/libphp7.4.so into server: /usr/lib/apache2/modules/libphp7.4.so: cannot open shared object file: No such file or directory
Action 'configtest' failed.
The Apache error log may have more information.
The error shows that the libphp7.4so module cannot be loaded. The reason is, as mentioned before, that the php7.4 packages were removed and this needs to be switched to PHP 8.1.
Disable the php7.4 Apache2 module and enable the new php8.1 Apache2 module:
root@jammy:~# a2dismod php7.4
Module php7.4 disabled.
To activate the new configuration, you need to run:
  systemctl restart apache2

root@jammy:~# a2enmod php8.1
Considering dependency mpm_prefork for php8.1:
Considering conflict mpm_event for mpm_prefork:
Considering conflict mpm_worker for mpm_prefork:
Module mpm_prefork already enabled
Considering conflict php5 for php8.1:
Enabling module php8.1.
To activate the new configuration, you need to run:
  systemctl restart apache2
This has now resolved the configuration error and apache2 can be restarted:
root@jammy:~# apache2ctl configtest
Syntax OK

root@jammy:~# systemctl restart apache2
PHP 7.4 to PHP 8.1 code changes
PHP errors caused by applications are likely to appear. The PHP application needs to support PHP 8.1 in this case. That's not the concern of Ubuntu, of course.
From personal experience, PHP 8.1 detects much more errors, including logical code errors. PHP 7.4 was pretty relaxed with such code – and (surprisingly!) somehow still worked.
You can find a couple of examples of errors after upgrading PHP from 7.4 to 8.1. Most likely these will be related to changes in mysqli_query and curly brackets in the code (they are no longer supported).
OpenSSH Server
There are a couple of configuration changes in the OpenSSH server configuration (/etc/ssh/sshd_config).
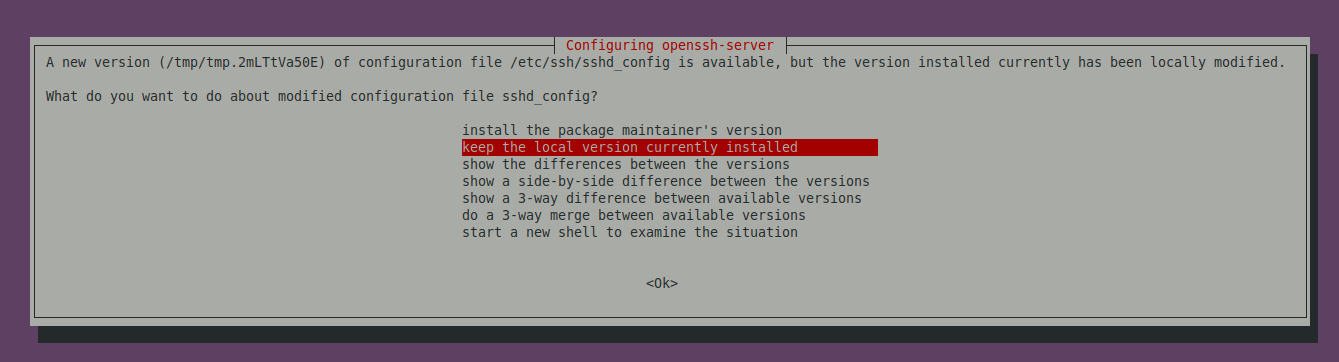
Besides adding or modifying some comments, the following changes are important to note:
- The configuration option ChallengeResponseAuthentication was replaced by KbdInteractiveAuthentication
- PID location was moved from /var/run/sshd.pid to /run/sshd.pid
Besides this, manually enabled options, such as PermitRootLogin, are removed if the maintainer's version is selected.
If you decide to keep your location configuration, you can use the following commands to change sshd_config to the new Ubuntu 22.04 options:
root@jammy:~# sed -i "s#/var/run/sshd.pid#/run/sshd.pid#" /etc/ssh/sshd_config
root@jammy:~# sed -i "s/ChallengeResponseAuthentication/KbdInteractiveAuthentication/g" /etc/ssh/sshd_config
Server suddenly offline (suspended)
With the upgrade from Ubuntu 20.04 to 22.04 comes a newer Systemd version (249). This version contains systemd-sleep and automatically suspends the machine if a desktop environment (X11 for example) is installed.
The bad thing is, Systemd doesn't make a difference between a Server and a Desktop (Workstation) installation. If a Desktop environment is detected, Systemd assumes a workstation and aumatically suspends the machine. The following logs can be seen in such a situation:
Apr  9 07:12:28 ubuntu ModemManager[1094]: <info>  [sleep-monitor-systemd] system is about to suspend
Apr  9 07:12:28 ubuntu gnome-shell[2619]: Screen lock is locked down, not locking
Apr  9 07:12:28 ubuntu systemd[1]: Reached target Sleep.
Apr  9 07:12:27 ubuntu pdns_server[905]: message repeated 4 times: [ Remote 127.0.0.1 wants '.|NS', do = 0, bufsize = 1232: packetcache HIT]
Apr  9 07:12:28 ubuntu pdns_server[905]: Remote 146.247.137.20 wants 'bote.ch|A', do = 1, bufsize = 1232: packetcache MISS
Apr  9 07:12:28 ubuntu systemd[1]: Starting Record successful boot for GRUB...
Apr  9 07:12:28 ubuntu systemd[1]: Starting System Suspend...
Apr  9 07:12:28 ubuntu systemd[1]: grub-common.service: Deactivated successfully.
Apr  9 07:12:28 ubuntu systemd[1]: Finished Record successful boot for GRUB.
Apr  9 07:12:28 ubuntu systemd[1]: Starting GRUB failed boot detection...
Apr  9 07:12:28 ubuntu systemd-sleep[47491]: Entering sleep state 'suspend'...
Apr  9 07:12:28 ubuntu kernel: [ 1231.015696] PM: suspend entry (s2idle)
Apr  9 07:12:28 ubuntu kernel: [ 1231.027916] Filesystems sync: 0.012 seconds
To prevent this from happening on servers, you either disable the Systemd timer units responsible for these actions or you configure /etc/systemd/sleep.conf according to the Suspend page on the Debian wiki.
root@ubuntu:~# systemctl mask sleep.target suspend.target hibernate.target hybrid-sleep.target


