In a previous article we shared how to migrate a VMware VMDK into a QCOW2 virtual disk format. In this article we want to increase the capacity of this qcow2 disk.
Show current disk information
Inside the VM, we can see the current root partition only has 4.1 GB available:
ck@vm1:~$ df -h /
Filesystem      Size  Used Avail Use% Mounted on
/dev/vda3        20G   14G  4.1G  78% /
This means we need to extend the /dev/vda disk, which is the virtual disk on this virtual machine.
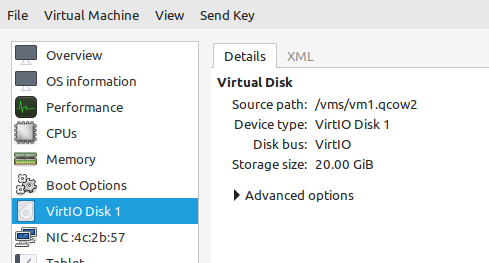
Let's examine the current qcow2 virtual disk. Information about the virtual disk can be retrieved through the "Virtual Machine Manager" user interface by opening the VM, then select View -> Details -> VirtIO Disk N:

A more generic way is to use the command qemu-img, which is used to handle virtual disks:
ck@mint ~ $ qemu-img info /vms/vm1.qcow2
image: vm1.qcow2
file format: qcow2
virtual size: 20 GiB (21474836480 bytes)
disk size: 19.4 GiB
cluster_size: 65536
Format specific information:
    compat: 1.1
    compression type: zlib
    lazy refcounts: false
    refcount bits: 16
    corrupt: false
    extended l2: false
Note that the VM needs to be shut down to run the qemu-img command (or you will get an error complaining about failing to get a shared write lock).
We now know that the size of this virtual disk size is 20 GB.
Extend (grow) virtual disk
To extend the virtual disk, let's use the qemu-img command with the resize sub-command. Append the path of the virtual disk (here /vms/vm1.qcow2) and the additional size (here +10G):
ck@mint ~ $ qemu-img resize /vms/vm1.qcow2 +10G
Image resized.
Let's use the info sub-command to verify the new virtual disk capacity:
ck@mint ~ $ qemu-img info /vms/vm1.qcow2
image: /vms/vm1.qcow2
file format: qcow2
virtual size: 30 GiB (32212254720 bytes)
disk size: 19.4 GiB
cluster_size: 65536
Format specific information:
    compat: 1.1
    compression type: zlib
    lazy refcounts: false
    refcount bits: 16
    corrupt: false
    extended l2: false
Awesome, the new virtual disk size is with 30 GB now 10 GB larger than before. You may have noticed though, that the disk size remained at 19.4 GB (as before).
Adjust partition inside guest OS (VM)
Once the VM is started up again, fdisk (or a similar command) shows the new disk size of 30 GB but still shows the /dev/vda3 partition as 19.5 GB:
ck@vm1:~$ sudo fdisk -l /dev/vda
GPT PMBR size mismatch (41943039 != 62914559) will be corrected by write.
The backup GPT table is not on the end of the device.
Disk /dev/vda: 30 GiB, 32212254720 bytes, 62914560 sectors
Units: sectors of 1 * 512 = 512 bytes
Sector size (logical/physical): 512 bytes / 512 bytes
I/O size (minimum/optimal): 512 bytes / 512 bytes
Disklabel type: gpt
Disk identifier: 3C68C034-5F06-47D8-88A1-E4BD589A289D

Device       Start      End  Sectors  Size Type
/dev/vda1     2048     4095     2048    1M BIOS boot
/dev/vda2     4096  1054719  1050624  513M EFI System
/dev/vda3  1054720 41940991 40886272 19.5G Linux filesystem
We can now use parted and the resizepart sub-command to extend the third partition to the end of the disk. parted even detects that not all space of the disk is used:
ck@vm1:~$ sudo parted /dev/vda
GNU Parted 3.4
Using /dev/vda
Welcome to GNU Parted! Type 'help' to view a list of commands.
(parted) resizepart
Warning: Not all of the space available to /dev/vda appears to be used, you can
fix the GPT to use all of the space (an extra 20971520 blocks) or continue with
the current setting?
Fix/Ignore? Fix
Partition number? 3
Warning: Partition /dev/vda3 is being used. Are you sure you want to continue?
Yes/No? Yes
End?  [21.5GB]? 100%
(parted) quit
Information: You may need to update /etc/fstab.
Let's verify the partition table with fdisk again:
ck@vm1:~$ sudo fdisk -l /dev/vda
Disk /dev/vda: 30 GiB, 32212254720 bytes, 62914560 sectors
Units: sectors of 1 * 512 = 512 bytes
Sector size (logical/physical): 512 bytes / 512 bytes
I/O size (minimum/optimal): 512 bytes / 512 bytes
Disklabel type: gpt
Disk identifier: 3C68C034-5F06-47D8-88A1-E4BD589A289D

Device       Start      End  Sectors  Size Type
/dev/vda1     2048     4095     2048    1M BIOS boot
/dev/vda2     4096  1054719  1050624  513M EFI System
/dev/vda3  1054720 62914526 61859807 29.5G Linux filesystem
Yes, the /dev/vda3 partition's size is now 29.5 GB, 10 GB larger than before.
Note it is also possible to adjust the virtual disk's partitions from the Hypervisor (VM Host), e.g. using the virt-resize command.
Adjust Filesystem
So far we have increased the capacity of the virtual disk (/vms/vm1.qcow2) and the partition (/dev/vda3) holding our Linux file system. However there is still one final step missing: Increasing/extending the file system itself.
In my case this is a ext4 formatted file system. This can be increased online, even if its the root partition:
ck@vm1:~$ sudo resize2fs /dev/vda3
resize2fs 1.46.5 (30-Dec-2021)
Filesystem at /dev/vda3 is mounted on /; on-line resizing required
old_desc_blocks = 3, new_desc_blocks = 4
The filesystem on /dev/vda3 is now 7732475 (4k) blocks long.
Cool, the new file system shows 10 GB of additional available space!
ck@vm1:~$ df -h /
Filesystem      Size  Used Avail Use% Mounted on
/dev/vda3        29G   14G   14G  51% /
With this, our VM has sufficient space again.
Note that there are also alternative ways how to online resize disks and Linux file systems.


