Running out of disk space on your Linux system? Luckily there are a couple of ways how extend the file system to increase available disk space. With a proper setup even without any downtime!
A rule of thumb
A file system (FS) resides "inside" a device – which can be a partition, logical volume or similar.
The device must therefore be extended (grown) before the file system.
Using disk partitions (VM)
Extending file systems of "real" disk partitions is the trickiest and most difficult task. It is easier to extend file systems on a mdadm RAID array and much easier to use Logical Volumes (see further down in this article).
To be able to (online) extend a disk partition, the disk partition must be set up in a way, that there is unused space right after the partition to be extended. This could be the case for the last partition, but it's very rarely the case for the other partitions of the drive.
The following fdisk output shows a typical partition table with two primary partitions (sda1 and sda2) and one extended partition (sda3) containing a logical partition (sda5). There is no un-allocated space between the partitions.
root@linux:~# fdisk -l /dev/sda
Disk /dev/sda: 200 GiB, 214748364800 bytes, 419430400 sectors
Disk model: Virtual disk
Units: sectors of 1 * 512 = 512 bytes
Sector size (logical/physical): 512 bytes / 512 bytes
I/O size (minimum/optimal): 512 bytes / 512 bytes
Disklabel type: dos
Disk identifier: 0x0002a213

Device     Boot    Start       End   Sectors  Size Id Type
/dev/sda1  *        2048  48828415  48826368 23.3G 83 Linux
/dev/sda2       48828416  56641535   7813120  3.7G 82 Linux swap / Solaris
/dev/sda3       56643582 419430399 362786818  173G  5 Extended
/dev/sda5       56643584 419430399 362786816  173G 8e Linux
As this is a Virtual Machine (seen by the Disk model), the virtual disk can usually be resized by the hypervisor (VMware, KVM, Proxmox, etc.). After the virtual disk was increased from 200GB to 220 GB, a block device rescan be be launched inside the VM's Linux:
root@linux:~# echo 1 > /sys/block/sda/device/rescanfdisk now shows the new disk size (220GB):
root@linux:~# fdisk -l /dev/sda
Disk /dev/sda: 220 GiB, 236223201280 bytes, 461373440 sectors
Disk model: Virtual disk
Units: sectors of 1 * 512 = 512 bytes
Sector size (logical/physical): 512 bytes / 512 bytes
I/O size (minimum/optimal): 512 bytes / 512 bytes
Disklabel type: dos
Disk identifier: 0x0002a213

Device     Boot    Start       End   Sectors  Size Id Type
/dev/sda1  *        2048  48828415  48826368 23.3G 83 Linux
/dev/sda2       48828416  56641535   7813120  3.7G 82 Linux swap / Solaris
/dev/sda3       56643582 419430399 362786818  173G  5 Extended
/dev/sda5       56643584 419430399 362786816  173G 8e Linux
As the virtual disk was extended, that means that additional sectors were added to this disk. We can therefore increase the extended partition (sda3) as it spans to the very end of the disk (see End sector). As the logical partition (sda5) is part of the extended partition, we can extend this partition, too.
To grow the extended partition sda3 and the logical partition sda5, we can use the parted command to resize the partition to the full extent (100%):
root@linux:~# parted /dev/sda
GNU Parted 3.3
Using /dev/sda
Welcome to GNU Parted! Type 'help' to view a list of commands.
(parted) resizepart
Partition number? 3
End?  [215GB]? 100%
(parted) resizepart
Partition number? 5
End?  [215GB]? 100%
(parted) quit
Information: You may need to update /etc/fstab.
Note: Old versions of parted don't support the resizepart sub-command. The resizepart command was added in parted 3.2. Make sure to use parted 3.2 or newer.
Another look with fdisk shows that the partitions sda3 and sda5 have been extended:
root@linux:~# fdisk -l /dev/sda
Disk /dev/sda: 220 GiB, 236223201280 bytes, 461373440 sectors
Disk model: Virtual disk
Units: sectors of 1 * 512 = 512 bytes
Sector size (logical/physical): 512 bytes / 512 bytes
I/O size (minimum/optimal): 512 bytes / 512 bytes
Disklabel type: dos
Disk identifier: 0x0002a213

Device     Boot    Start       End   Sectors  Size Id Type
/dev/sda1  *        2048  48828415  48826368 23.3G 83 Linux
/dev/sda2       48828416  56641535   7813120  3.7G 82 Linux swap / Solaris
/dev/sda3       56643582 461373439 404729858  193G  5 Extended
/dev/sda5       56643584 461373439 404729856  193G 8e Linux
If /dev/sda5 would be a partition with a filesystem, the following command would be enough to grow the filesystem:
# Grow ext filesystem
root@linux:~# resize2fs /dev/sda5

# Grow xfs filesystem
root@linux:~# xfs_growfs /mountpoint
However in this situation the partition sda5 is used as a Physical Volume (PV) for LVM. In this case use pvresize followed by the path:
root@linux:~# pvresize /dev/sda5
  Physical volume "/dev/sda5" changed
  1 physical volume(s) resized or updated / 0 physical volume(s) not resized
This worked fine for the last partition of the disk, without any downtime. However if you need to increase the primary partition of this disk, you are out lof luck: You will be forced to do this offline.
On physical machines it is not possible to increase the sectors of the physical disk (without exchanging the disk). A possibility for physical machines would be to use mdadm RAID arrays; see next chapter.
Using mdadm RAID
File systems using mdadm RAID arrays can be extended without downtime, too. It is even possible to increase the root partition (/) this way. However a couple of requirements must be fulfilled first:
- The physical machine must support hot-swap devices
- Larger disks than the currently used disks must be at hand
- The Linux OS must have the partitions mounted from the mdX RAID devices (or Logical Volumes), not directly from the physical disks
The idea behind this is that the redundant RAID array, consisting of two or more physical disks, is extended by replacing the disks with larger disks. But instead of keeping the same partition table, the partitions used by mdadm are created larger than before and then added back into the array. The array is then grown and afterwards the file system(s) are extended, too.
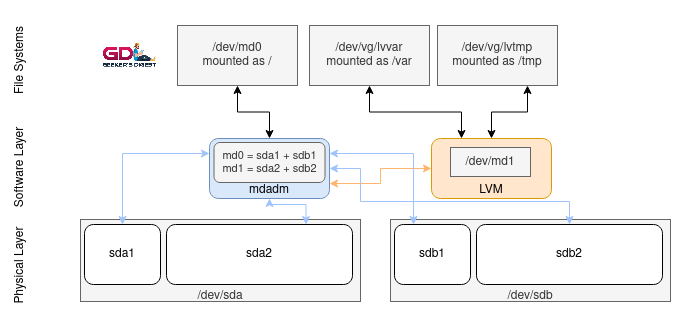
Let's assume the following setup: Two identical disks (sda + sdb) each have two partitions. These partitions are used by mdadm to create two RAID-1 devices: md0 and md1. While /dev/md0 is used as the root partition of this Linux system, /dev/md1 is used as Physical Volume (PV) for LVM.

Now the first disk (sda) is removed from the array:
root@linux:~# mdadm --manage /dev/md0 --fail /dev/sda1
root@linux:~# mdadm --manage /dev/md1 --fail /dev/sda2
root@linux:~# mdadm --manage /dev/md0 -r /dev/sda1
root@linux:~# mdadm --manage /dev/md1 -r /dev/sda2
The physical drive sda can now be replaced with a larger drive. As soon as the new /dev/sda can be accessed by Linux, use fdisk (or another partition command) to create two new partitions (sda1 and sda2) – but use a larger size than previously used. Then add these partitions back into the mdadm arrays:
root@linux:~# mdadm --manage /dev/md0 -a /dev/sda1
root@linux:~# mdadm --manage /dev/md1 -a /dev/sda2
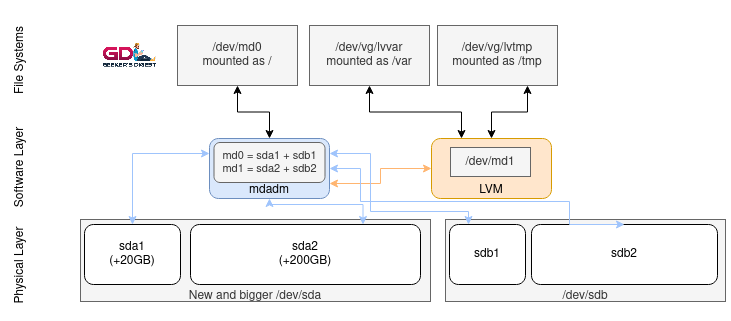
Watch the mdadm status (cat /proc/mdstat) and wait until the raid arrays are successfully recovered. This gives you the intermediary situation that one of the disks (and its partitions) is larger than the other one, yet the mdraid devices md0 and md1 are still the same size:
Once mdadm status shows all arrays healthy again, do the same operation with the second disk (sdb): Set as failed, remove from array, replace disk, create larger partitions, add back to array (see above – but adjust the commands for this disk sdb).
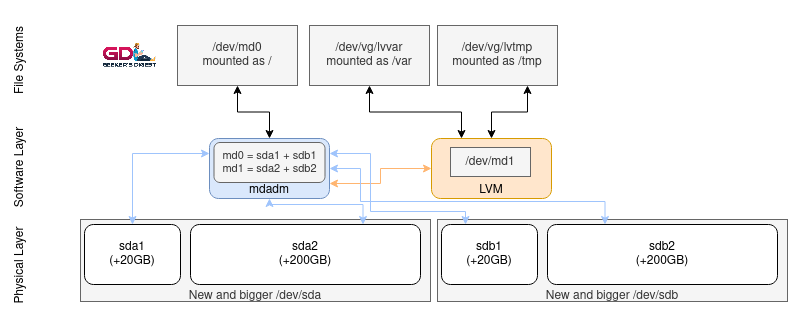
Now that both disks were replaced with larger ones and the partitions used by mdadm are larger than before, the mdadm arrays (devices) can be extended:
root@linux:~# mdadm --grow /dev/md0 --size=max
root@linux:~# mdadm --grow /dev/md1 --size=max
Check the mdadm status again and wait until all operations are completed:
root@linux:~# cat /proc/mdstat
[...]
md1 : active raid1 sda2[2] sdb2[3]
      234372096 blocks super 1.2 [2/2] [UU]
      [===============>.....]  resync = 78.2% (183370304/234372096) finish=6.3min speed=134554K/sec
      bitmap: 1/1 pages [4KB], 131072KB chunk
Finally the root file system (ext4 in this example) can be extended (online!) with the following command:
root@linux:~# resize2fs /dev/md0The /dev/md1 device is used as Physical Volume. This can be increased, too:
root@linux:~# pvresize /dev/md1This gives additional available space in the Volume Group and therefore to the Logical Volumes.
With this method, all file systems, including the root file system (/), can be extended – even without downtime.

Using hardware raid controller
What applies to mdadm RAID also applies to hardware RAID controllers. All modern RAID controllers (should be) are capable of online resizing the RAID arrays.
The Linux OS detects a Logical Drive (the RAID device using the Physical Drive(s) in the background) as /dev/sda, sdb, and so on. The Kernel retrieves the disk information from the hardware RAID controller and does not see (by default) the physical drives.
In the following example, a HP SmartArray controller is used for online resizing of a Logical Drive, seen as /dev/sdc by Linux. To communicate with the SmartArray controller from within the Linux OS, the commands hpacucli or ssacli (newer) are used.
root@linux ~ # pvs
  PV         VG       Fmt  Attr PSize   PFree
  /dev/sda5  vgsystem lvm2 a--  152.75g  63.09g
  /dev/sdc   vgbackup lvm2 a--    1.82t 612.98g

root@linux ~ # ssacli ctrl slot=0 ld all show status

   logicaldrive 1 (186.28 GB, RAID 1): OK
   logicaldrive 3 (1.82 TB, RAID 1): OK
After replacing the first physical drive behind LD3, wait until the RAID rebuild completes (ssacli ctrl slot=0 ld all show status). Then replace the second physical drive behind LD3 and again wait until the controller has finished the rebuild.
Finally, extend the Logical Disk:
root@linux ~ # ssacli ctrl slot=0 ld 3 modify size=max forcedThe LD3 should now show the new size:
root@linux ~ # ssacli ctrl slot=0 ld all show status

   logicaldrive 1 (186.28 GB, RAID 1): OK
   logicaldrive 3 (3.64 TB, RAID 1): OK
Now the OS should be able to see the new size of the disk /dev/sdc and it can be resized:
root@linux ~ # pvresize /dev/sdc
  Physical volume "/dev/sdc" changed
  1 physical volume(s) resized / 0 physical volume(s) not resized

root@linux ~ # pvs
  PV         VG       Fmt  Attr PSize   PFree
  /dev/sda5  vgsystem lvm2 a--  152.75g 63.09g
  /dev/sdc   vgbackup lvm2 a--    3.64t  2.42t
Note: Depending on the type of hardware raid controller, a device rescan might be necessary.
Using Logical Volumes (LVM)
When using Logical Volume Manager (LVM) for partitions, each Logical Volume (LV) can be extended, as long as there is space available in the Volume Group (VG). This is the easiest and fastest method to grow the file system(s) without downtime.
This makes working with Logical Volumes very interesting, as the Volume Groups and Logical Volumes can be extended while the system keeps running.
Extend Logical Volume
To extend a Logical Volume, the lvextend command is used. The command supports a fixed size or a differential size (+) using the -L parameter. Another possibility is to use the -l parameter to increase the LV with a percentage of the remaining space of the VG.
# Example 1: Extend LV (lvvar) from VG (vgroot) to a specific size (50G)
root@linux ~ # lvextend -L50G /dev/vgroot/lvvar

# Example 2: Extend LV (lvvar) from VG (vgroot) with additional 10G
root@linux ~ # lvextend -L+10G /dev/vgroot/lvvar

# Example 3: Extend LV (lvvar) from VG (vgroot) with the remaining space of the VG
root@linux ~ # lvextend -l+100%FREE /dev/vgroot/lvvar
Resize File Systems
The following examples use the file systems on Logical Volumes (LV), however the actual file system extend command also applies on disk partitions or raid devices.
Extend ext2/ext3 file system
ext2 and ext3 (basically ext2 with journaling enabled) support dynamic file system growth.
First increase the logical volume to the wanted size using lvextend, then run the ext2online (or resize2fs) command on the path to the LV:
root@linux ~ # lvextend –L +1GB /dev/vgroot/lvvar
root@linux ~ # ext2online /dev/vgroot/lvvar
Note that ext2online is a fairly old command and was replaced by resize2fs in newer Linux distributions.
Extend ext4 file system
ext4 is successor of ext3 and the de-facto standard file system these days on Linux. It is very widely used and is well integrated into the Linux Kernel.
First increase the logical volume to the wanted size using lvextend, then run the resize2fs command on the path to the LV:
root@linux ~ # df -h /tmp
Filesystem                 Type  Size  Used Avail Use% Mounted on
/dev/mapper/vgsystem-lvtmp ext4  1.8G  2.9M  1.8G   1% /tmp

root@linux ~ # lvextend -L2G /dev/vgsystem/lvtmp
  Size of logical volume vgsystem/lvtmp changed from <1.86 GiB (476 extents) to 2.00 GiB (512 extents).
  Logical volume vgsystem/lvtmp successfully resized.

root@linux ~ # resize2fs /dev/vgsystem/lvtmp
resize2fs 1.44.5 (15-Dec-2018)
Filesystem at /dev/vgsystem/lvtmp is mounted on /tmp; on-line resizing required
old_desc_blocks = 1, new_desc_blocks = 1
The filesystem on /dev/vgsystem/lvtmp is now 524288 (4k) blocks long.

root@linux ~ # df -h /tmp
Filesystem                 Type  Size  Used Avail Use% Mounted on
/dev/mapper/vgsystem-lvtmp ext4  2.0G  2.9M  2.0G   1% /tmp
Extend xfs file system
xfs is since 2014 supported by most Linux distributions as file system type. It has become the default file system type in RHEL (Red Hat Enterprise Linux) distributions.
First increase the logical volume to the wanted size using lvextend, then run the xfs_growfs command on the path to the mount point (not the LV!):
root@linux ~ # df -h /mnt
Filesystem                 Type  Size  Used Avail Use% Mounted on
/dev/mapper/vgsystem-lvmnt xfs   2.0G   35M  2.0G   2% /mnt

root@linux ~ # lvextend -L+1G /dev/vgsystem/lvmnt
  Size of logical volume vgsystem/lvmnt changed from 2.00 GiB (512 extents) to 3.00 GiB (768 extents).
  Logical volume vgsystem/lvmnt successfully resized.

root@linux ~ # xfs_growfs /mnt
meta-data=/dev/mapper/vgsystem-lvmnt isize=512    agcount=4, agsize=131072 blks
         =                       sectsz=512   attr=2, projid32bit=1
         =                       crc=1        finobt=1, sparse=1, rmapbt=0
         =                       reflink=0
data     =                       bsize=4096   blocks=524288, imaxpct=25
         =                       sunit=0      swidth=0 blks
naming   =version 2              bsize=4096   ascii-ci=0, ftype=1
log      =internal log           bsize=4096   blocks=2560, version=2
         =                       sectsz=512   sunit=0 blks, lazy-count=1
realtime =none                   extsz=4096   blocks=0, rtextents=0
data blocks changed from 524288 to 786432

root@linux ~ # df -h /mnt
Filesystem                 Type  Size  Used Avail Use% Mounted on
/dev/mapper/vgsystem-lvmnt xfs   3.0G   36M  3.0G   2% /mnt
Extend btrfs file system
Btrfs is a file system that was added to the Linux Kernel a long time ago, but it took many years until btrfs was deemed stable enough for production systems. Btrfs' advantage is a very sophisticated snapshot technology, comparable to ZFS.
To extend a btrfs filesystem, use the btrfs filesystem resize command on the mounted path, once the device (here LV) was extended:
root@linux ~ # df -h /mnt
Filesystem                 Type   Size  Used Avail Use% Mounted on
/dev/mapper/vgsystem-lvmnt btrfs  2.0G  3.4M  2.0G   1% /mnt

root@linux ~ # lvextend -L3G /dev/vgsystem/lvmnt
  Size of logical volume vgsystem/lvmnt changed from 2.00 GiB (512 extents) to 3.00 GiB (768 extents).
  Logical volume vgsystem/lvmnt successfully resized.

root@linux ~ # btrfs filesystem resize max /mnt
Resize '/mnt' of 'max'

root@linux ~ # df -h /mnt
Filesystem                 Type   Size  Used Avail Use% Mounted on
/dev/mapper/vgsystem-lvmnt btrfs  3.0G  3.4M  3.0G   1% /mnt
Extend ReiserFS file system
ReiserFS was the default file system type in SUSE/SLES servers a few years ago. After the arrest of the ReiserFS inventor Hans Reiser, the development of ReiserFS stopped.
First increase the logical volume to the wanted size using lvextend, then run the resize_reiserfs command on the device path:
root@linux ~ # df -h /var
Filesystem                Size  Used Avail Use% Mounted on
/dev/mapper/vgroot-lvvar  3.0G  2.8G  282M  91% /var

root@linux ~ # lvextend -l+100%FREE /dev/vgroot/lvvar
  Extending logical volume lvvar to 3.78 GB
  Logical volume lvvar successfully resized

root@linux ~ # resize_reiserfs /dev/vgroot/lvvar
resize_reiserfs 3.6.19 (2003 www.namesys.com)
resize_reiserfs: On-line resizing finished successfully.

root@linux ~ # df -h /var
Filesystem                Size  Used Avail Use% Mounted on
/dev/mapper/vgroot-lvvar  3.8G  2.8G  1.1G  73% /var


LVM:
You can also run lvrextend with the -r flag to automatically resize after extending.
ie. lvresize -rl +100%FREE vg00/lv00